Phone Numbers and Routing Reference
Use this reference for number settings, Voice and Messaging routing, and outbound registration. Start with Phone Voice or Phone SMS for guided setup.
The Phone Voice guide includes the walkthrough of business-hours and voicemail routing on an existing number.
Who can manage a number
Phone configuration uses Workspace-wide role scopes: phones:read to view lines, phones:write to create or edit lines and routing, and phones:admin to delete them. There is no per-number role permission checklist.
The Owner chooses who handles calls and texts when routing reaches them; it does not grant permission to edit the number. Role for new callers assigns a role to a newly recognized caller; it does not grant the operator phone-management permissions. A routed Workflow may also have a Member Role Gate that restricts who can enter it.
See Roles & Permissions to configure staff scopes.
Setting Up Phone Numbers
- Go to Phone Numbers and click New Phone Number
- Click Register a new number. Search the provider's inventory by area code (or by a word in the number), choose a line, and review the billed price
- Confirm with Register number — this is the step that bills. Choosing a number on its own never does. The dialog then returns to the form with the new number selected. Back (or Escape) leaves registration and returns to the form with what you had already typed
- Name it, check the channels it carries (Enable voice or Enable fax, Enable SMS, Enable WhatsApp), choose Who answers — AI answers, A human answers, or Custom routing — and click Create Phone Number
Your organization plan may include phone lines across all of its workspaces. Lines beyond that included count cost $2/month for local or $3/month for toll-free on either Stripe or direct billing. A billing owner confirms a self-service purchase. Buying a line adds it to the organization's existing subscription; it does not create a subscription per number or workspace.
Voice and incoming texts are available once the line is active. Sending US SMS requires separate carrier approval: A2P 10DLC for local lines or toll-free verification for toll-free lines.
Phone Number Settings
Edit a number on its Settings tab. Edit on the phone list, and on an Agent's phone panel, opens that tab.
| Setting | What It Does |
|---|---|
| Name | Internal name for this number |
| Enable voice / Enable fax | Answer calls as a conversation, or as a fax line — one or the other |
| Greeting message | Played to the caller before the AI answers and while a person is being rung. Shown while voice is on |
| Require consent | The caller confirms by voice or keypad before the call continues. Shown once there is a greeting |
| Message for callers | Played when a call arrives while voice is off. Leave empty to play nothing |
| Enable SMS / Enable WhatsApp | Accept and handle incoming texts |
| Reply to texts | Sent when a text arrives while SMS and WhatsApp are both off. Leave empty to send nothing. A WhatsApp message to a workspace not declared free of PHI gets no reply |
| Outbound texting | Shows outbound registration status while SMS is on; use the organization Phone Numbers page to enable sending |
| Fax Owner / Fax landing folder | Receive fax documents under the selected owner and folder. Shown while fax is on |
| Owner | Select a human or Agent who owns the number. The owner answers known callers no rule answers, and This number's owner rules reach them |
| Routing Rules | Separate ordered lists for calls and messaging; SMS and WhatsApp share the Messaging list, and AI rules select their Workflow |
Choose each AI rule's Workflow in the relevant Voice or Messaging list. A fax number's calls go straight to the fax receiver, whoever calls; its Routing Rules apply to texts only. A fax from a sender the number doesn't recognise is filed under the fax owner.
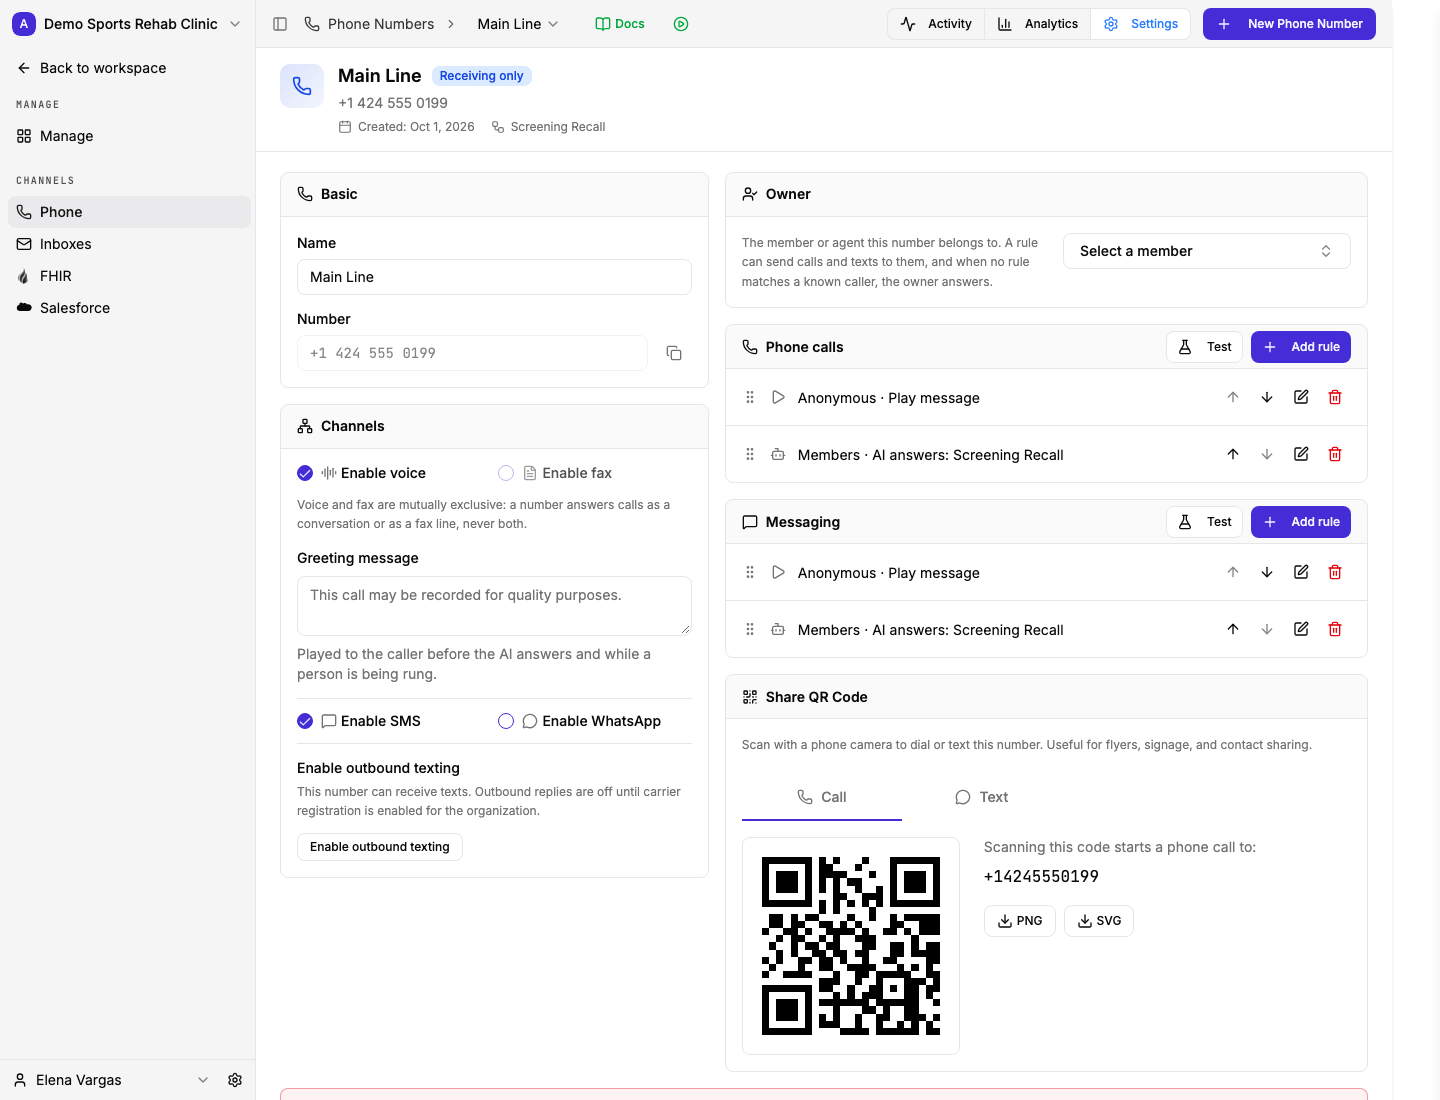
Choose which channels this line handles. Phone configuration requires phones:write; enabling a channel does not grant staff access.
Channels, the routing owner, and ordered rules serve different purposes on phone Settings.
View full size ↗The first label starts open. Hover or focus to explore; click or tap to pin.
Routing Rules
Routing Rules decide where an inbound call or message goes. Every phone number has its own ordered list for Voice and Messaging. SMS and WhatsApp share the Messaging list. Gravity Rail reads the relevant list from the top and runs the first matching rule.
- Go to Phone Numbers and open a number
- Open the Settings tab and find the Voice or Messaging section
- Click Add rule, select an existing rule to edit it, or reorder the list
Rules belong to this number; there is no workspace-wide routing list. A new number starts with an AI destination for Members and a message that turns anonymous callers away. To let unknown callers through, set a rule's audience to Anyone or Anonymous and choose its Role for new callers; signup is not required. Review both caller types before putting a number into service.
The owner is one Member or Agent who looks after the number. Pick them in the Owner card on Settings. The routing rules still run: a This number's owner rule sends the call or text to the owner, and when no rule answers a known caller, the owner does. A human owner is rung in the browser, and a missed call goes to voicemail for them; an Agent owner answers with its realtime voice model, and a call goes to voicemail if the Agent has none. Callers nobody recognises reach the owner only through a rule, which names their Role for new callers. To clear the owner, first remove the rules that send calls to them — or do both in one save.
A number created from an Agent's phone panel has that Agent as its owner and starts with no rules, so the Agent answers every known caller when it has a realtime voice model; otherwise calls go to voicemail. Choose a Role for new callers in the create form to add an Anyone · This number's owner rule, so callers nobody recognises reach the Agent too.
What a rule says
| Part | What you choose |
|---|---|
| Schedule | Always, During business hours, After business hours, or Custom — your own weekly schedule. The hours and timezone come from Business Hours. |
| Audience | Anyone, Anonymous, or Members. A Members audience can be narrowed to a saved Member Filter. |
| What happens | Exactly one action, from the table below. |
Actions
| Action | What it does |
|---|---|
| AI answers | Your AI agent takes the call or the text. Choose a workflow, or leave it unset for a plain agent conversation. When the rule admits anonymous callers, choose its Role for new callers: the Role an unknown caller gets as a new Member. |
| This number's owner | The number's owner answers, the same way as when no rule matches. Offered only while the number has an owner. When the rule admits anonymous callers, choose its Role for new callers. |
| A person answers | Ring a human. The target is an operator group, a specific member, the caller's primary contact, or an external phone number (dialled on voice; receives forwarded texts on messaging). Ring timeout is 5–120 seconds, 30 by default. When the rule admits anonymous callers and rings a person (any target except an external phone number), choose its Role for new callers; a forward to an external number takes none. |
| Voicemail | Record and transcribe a message, after an optional greeting. Voice only. |
| Play a message | Speak the message and hang up (voice), or send it as an auto-reply (messaging). |
| Ignore | Hang up silently, or send no reply. Only offered on rules that match anonymous callers. |
| Sign up | Invite the caller to become a Member with a Role you pick. Only offered on rules that match anonymous callers. |
On messaging, A person answers behaves two ways depending on the target:
- an external phone number gets the text relayed to it — sender line plus the message body, exactly the way forwarding always worked;
- an operator group offers the chat to that group's live operators and leaves it waiting for them in Needs Response. The AI does not answer it.
If nobody answers, the next rule runs
A person answers is the one action that can fail to settle an interaction. When the ring times out, the target is offline, the number can't be dialled, or the caller has no primary contact, the walk resumes at the next rule that matches. That cascade is how you build every "…and if that doesn't work" arrangement: instead of configuring a fallback inside a setting, you write the fallback as the next rule.
Every other action ends the walk. Once the AI is on the call, the voicemail is recording, or the message has played, the rules are done.
If no rule matches, the channel uses its built-in fallback rather than another rule list. Put an explicit final rule in each caller branch so the outcome is clear, then use Test with a time and caller type to check which rule matches. Test does not place a call or verify that a human will answer; check the actual call and message paths before launch.
Worked examples
Rules are listed in order, top first. An AI answers rule, or an A person answers rule that rings a person, that matches any caller also names its Role for new callers; the examples leave it out.
AI in hours, a human after hours, voicemail if they miss it (voice)
- During business hours · any caller → AI answers (Support Triage)
- After business hours · any caller → A person answers — on-call group, 30 s
- After business hours · any caller → Voicemail
Auto-reply to texts after hours (messaging)
- After business hours · any caller → Play a message — "Thanks for texting Northwind Clinic. We're closed until 9am and will reply then."
- Always · any caller → AI answers (Support Triage)
Send every call to the answering service (voice)
- Always · any caller → A person answers — external number +1-555-0100
A member's own coordinator first, then the team (voice)
- Always · Member → A person answers — the caller's primary contact, 20 s
- Always · any caller → A person answers — front desk group
- Always · any caller → Voicemail
A signup line (voice and messaging)
- Always · Anonymous → Sign up as Patient
- Always · Member → AI answers (Patient Onboarding)
A members-only line (voice and messaging)
- Always · Anonymous → Play a message — "This line is for registered patients. Please call the main office on +1-555-0123."
- Always · Member → AI answers (Member Services)
Rules matching anonymous callers normally sit at the top: whether a caller is admitted at all is settled before where they go.
What a new number starts with
A new routed number starts with AI answers for Members on each channel, below an Anonymous · Play a message rule that turns unknown callers away. To admit them, edit the AI rule's audience to Anyone and choose its Role for new callers, or add a Sign up rule. A rule that admits anonymous callers without a role shows Role required in the list and asks for one when you save it.
Review both admission and destination rules before sharing the number. A human answers at creation writes its rules for Members and keeps the anonymous-caller rule.
Testing a rule list
Use Test in the channel's section to dry-run the list. Pick a caller — anonymous, or a specific member — and a time, and Gravity Rail shows which rule would run, along with every rule it considered on the way.
Voice Calls
How AI Voice Works
When someone calls your number:
- Your AI agent answers with a greeting
- The caller speaks naturally
- AI responds in real-time with speech
- The conversation follows your workflow
The AI can:
- Answer questions
- Collect information
- Book appointments
- Transfer to humans
- End calls appropriately
Where Calls Go
Answering, forwarding, voicemail and ringing your operators are all Routing Rules on the number's Voice list. Three things are specific to voice:
- Voicemail is voice-only, and each voicemail rule carries its own greeting.
- A person answers can target an external phone number, which bridges the caller over the phone network — a real call forward.
- A ring nobody picks up is not the end of the call. The next matching rule runs, so put Voicemail or Play a message after your ring rule to say what happens then.
voicemail:received Event Rule Trigger
When a voicemail is recorded and transcription resolves, Gravity Rail emits a voicemail:received event that you can wire to an Event Rule (for example, to fire a webhook:send action).
When it fires: Once per voicemail, after transcription resolves — both on success (transcript available) and on failure (transcript is null, transcriptionStatus is FAILED). This guarantees that a voicemail never silently drops.
Webhook payload: The webhook:send action delivers a JSON body with the standard envelope (event, eventId, eventRule, workspace) plus a voicemail object:
| Field | Description |
|---|---|
voicemail.uuid | Stable UUID of the voicemail record |
voicemail.phoneNumberId | ID of the phone number that received the call |
voicemail.callerNumber | Caller's phone number |
voicemail.callerName | Caller name, when available |
voicemail.recordingDuration | Length of the recorded message, in seconds |
voicemail.transcriptionStatus | COMPLETED or FAILED |
voicemail.transcript | Transcribed text, or null when transcription failed |
voicemail.targetMemberId | ID of the Member the caller was trying to reach, or null |
voicemail.status | Voicemail status (NEW, LISTENED, ARCHIVED) |
voicemail.createdAt | ISO-8601 timestamp of when the voicemail was created |
voicemail.updatedAt | ISO-8601 timestamp of the last update |
voicemail.targetMemberId is the caller's primary contact when best-effort
attribution resolves — an internal ID, not PHI. It is null when the caller
has no primary contact, attribution lookup fails, or the voicemail predates the field.
PHI note: callerNumber, callerName, and transcript travel in the webhook payload over the HMAC-signed HTTPS channel. Subscribing to voicemail:received is an explicit opt-in to receiving that content — treat the payload as PHI and handle it accordingly. The raw S3 audio key and recording URL are excluded from the payload; retrieve audio via the authenticated voicemail API endpoint instead.
To set up a webhook on voicemail:
- Go to Automation → Event Rules
- Click New Rule and choose voicemail:received as the trigger
- Add a webhook:send action with your endpoint URL
- Save and test using the Test Webhook button in the wizard
Setting Business Hours
- Go to Settings → Workspace Settings
- Configure your business hours
- Use
is_business_hoursin CEL conditions. See the Developer CEL reference for the variables available in each context.
Call Forwarding
Two separate things send a call to a person:
- A routing rule sends it before the AI ever answers — add A person answers with an external phone number target to the number's Voice list. Give it an after-hours schedule if needed.
- The Forward Call ability lets the AI transfer a call it is already on, mid-conversation. Add it to the workflow — see Phone Call Tools.
SMS Messaging
How SMS Works
Incoming text messages work like chat:
- User texts your number
- The conversation follows your workflow
- Full history is saved to the chat
Receiving texts does not require outbound carrier registration. Before an Agent or team member can reply by SMS, complete carrier registration and enable sending on the number. Registration fees are shown before a billing owner confirms; the recurring campaign service begins after carrier approval.
SMS Settings
| Setting | What It Does |
|---|---|
| Receive texts | Turn incoming SMS handling on or off |
| A2P Status | Shows whether sending is off, being set up, or available |
Where an inbound text goes — the AI, an auto-reply, a relay to another number, or your operators — is the number's shared Messaging Routing Rules list.
WhatsApp Messaging
The same phone numbers can also handle WhatsApp, but only in a workspace declared free of PHI: WhatsApp is not HIPAA-eligible (see WhatsApp and HIPAA). If your workspace has the WhatsApp feature enabled, a per-number WhatsApp toggle appears alongside Enable SMS and Enable Voice. Turning it on lets the number send and receive WhatsApp messages; the shared Messaging Routing Rules decide where inbound SMS and WhatsApp messages go.
Key differences from SMS:
- Feature flag required —
whatsappmust be enabled on the workspace (ask your org admin) - Per-member opt-in — Members have a separate WhatsApp preference (
notifyWhatsapp, set through the Members API) that defaults to off; outbound actions and agent tools skip members who haven't opted in - 24-hour window — Outbound sends after 24 hours of member inactivity must use an approved WhatsApp template
- Shared routing — WhatsApp and SMS use the same ordered Messaging Routing Rules list
- Opt-out via STOP — Members opt out the same way as SMS, by replying STOP
See WhatsApp Messaging for the full guide, including sandbox setup, template messages, and the whatsapp:send action.
Web Voice
Users can also make voice calls from your websites:
- Enable voice on your Site
- Users click the microphone icon
- Browser-based voice call with your AI
No phone number needed - works directly through the browser.
Voice Configuration
Agent Voice
Pick how your AI sounds:
- Go to Members → Agents
- Edit your agent
- Select a Voice option
Available voices vary by AI model.
Phone Abilities
Add these to workflows for phone-specific features:
| Ability | What It Does |
|---|---|
| Phone Call Tools | Grant hangup and configure call forwarding |
Add via the Abilities tab on workflows or tasks. A workflow's AI can only hang up when Phone Call Tools is enabled or the hang-up tool is selected explicitly. This also covers calls to a number owned by an Agent, because those still run on the number's workflow. An Agent outside a workflow can always hang up.
Common Setups
Customer Support Line
- Workflow: Support workflow with escalation task
- Abilities: Phone Call Tools
- Voice rules: During business hours · any caller → AI answers · then After business hours · any caller → A person answers (support group) · then After business hours · any caller → Voicemail
- SMS rules: Always · anyone → AI answers
- WhatsApp rules: Always · anyone → AI answers (only in a workspace declared free of PHI — see WhatsApp and HIPAA)
Appointment Booking
- Workflow: Booking workflow with calendar access
- Abilities: Calendar Booking, Phone Call Tools
- Voice rules: Always · any caller → AI answers (Booking)
- Let AI schedule appointments by voice
After-Hours Answering
- Business Hours: 9am–5pm weekdays, set in Workspace Settings
- Voice rules: During business hours · any caller → AI answers · then Always · any caller → Voicemail, greeting "Thanks for calling. We're closed. Leave a message."
- AI handles calls during hours; everything outside them records a voicemail
Sharing via QR Code
On each phone number's Settings tab, the Share QR Code section generates a scannable QR that encodes a tel: or sms: URI for the workspace number.
- Go to Phone Numbers and open a phone number
- Open the Settings tab and scroll to Share QR Code
- Toggle between Call (
tel:) and Text (sms:) modes - In Text mode, optionally type a pre-filled message. If the workspace has a signup code, use Copy from workspace signup code so scanners text that code automatically. Set or change the signup code in workspace settings.
- Download as PNG or SVG for flyers, signage, websites, or contact cards
When a visitor scans the code with a phone camera, their dialer or SMS composer opens with your workspace number pre-filled — and, for a Text QR, any message you included. Encoding the signup code in the QR means someone who scans a flyer can join with one tap, without typing the code.
Direct Member Calls
Call other workspace members directly through Operator Mode (human-to-human, no AI):
- Open the Messaging panel and click Create chat.
- Choose Me as the caller and Another member as the recipient.
- Choose Direct, select Call, and click Start call.
Your browser opens the live Operator Mode call panel while Gravity Rail dials the member. They see the selected workspace phone number as caller ID. The workspace must have a voice-enabled phone number, and the recipient must have a callable phone number.
See Live Operator Mode for the complete flow and permission requirements.
Tips
- Test your number - Call it yourself first
- Set clear greetings - Configure initial messages in your workflow
- Use business hours - Don't let AI respond at 3am (unless you want it to)
- Enable SMS too - Some users prefer texting
- Check call logs - Review conversations in Chats
Registering to send texts
Receiving texts needs no registration. Sending them does: US carriers only deliver messages from a business that has been verified, registered under a brand name, and approved for a described messaging program.
That whole process — verifying the business, registering a brand, and describing the campaign — lives in its own section of the organization, under Compliance. The evidence page carriers audit is generated for you. It is documented in full there:
- Business Registration — why carriers require any of this, the Business → Brand → Campaign chain, what order things really happen in, and realistic timelines.
- Business details — every field carriers verify and why, including the legal-name and tax-ID match that most rejections come down to.
- Brands — the name your texts come from, and what registering one costs.
- Campaigns — the messaging program, the consent wording, the sample messages, and the public evidence page carriers review.
Once a campaign is verified, enable sending on each purchased number from the organization's Phone Numbers page.
Registering how your calls appear
Outbound calls work without any registration, but unregistered calls arrive with no proof they are from you — so they can be labelled "Spam Likely" or show a bare number. Three separate registrations change that: signing your calls so carriers trust them, registering your calling pattern with analytics providers, and putting your business name on the caller ID.
See Outbound calling for what each one does, what it needs, and — just as important — what it does not do.
After editing either field, click Save to persist the overrides. The Live preview panel on the right updates the rendered enrollment-form checkbox as you type, and refreshes the MessageFlow preview after you save.
Default opt-in / opt-out / help keywords
Carriers require that standard keywords trigger the corresponding automated responses:
| Keyword | Effect |
|---|---|
STOP | Member opts out; automatic opt-out reply sent |
START | Re-subscribes a previously opted-out member |
HELP | Automatic help reply sent with support contact |
These keywords are pre-configured as carrier defaults and do not need to be listed in the disclosure text unless you want to surface them explicitly to patients.
Multi-brand organizations
A business can have more than one brand: the same legal entity, different sender names. Today a business holds one brand: the checklist opens the brand already on file, and it can't start a second one yet. Another business is a different checklist, reached from the business switcher or from the business list when the organization has more than one.
Enrollment Site Setup
An Enrollment site is a published patient-facing opt-in form linked to a specific brand. It is not required to submit a campaign. Submitting the campaign submits the hosted evidence page, which is generated for every brand from the defaults. An uploaded file replaces the mock on that page. An evidence URL replaces the citation sent to carriers. A linked enrollment site is a separate live form and does not change the page.
How sites are provisioned
For most organizations the site is provisioned automatically. When you confirm Register brand and your organization has exactly one workspace, the system creates (or reuses) a gravity-health-enrollment site in that workspace and links it to the brand — no manual action needed.
For organizations with more than one workspace, auto-provisioning cannot determine the right workspace, so the site is not provisioned automatically. The link is set through the API (POST …/enrollment-site/provision, or PUT …/enrollment-site to link an existing Site); it has no screen of its own.
Linking an enrollment site
A brand is linked to a published enrollment Site automatically when it is
registered, if the organization has exactly one workspace. The link records which
workspace's opt-in form the brand's consent text is rendered on; one shared Site
serves every brand, because the live form resolves the brand from the brand URL
parameter.
For an organization with several workspaces, the link is set through the API
(PUT /api/v2/o/{org_uuid}/a2p-brands/{brand_uuid}/enrollment-site, or
POST …/enrollment-site/provision to create a Site first). It has no screen of
its own.
Eligible sites
An eligible enrollment site is one of the following:
- A published source site (a
source-site-template site with a published release) - A site using an enrollment theme —
cosan-enrollment,cosan-enrollment-v2, orgravity-health-enrollment
The site does not need to be set to public; enrollment forms are served regardless of the is_public flag.
Member site links
In an outbound SMS or email action message body, or an in-call Send SMS message,
wrap the destination's public Site URL with site_autologin_link:
Hi {{member.first_name}} — please review your options at
{{ "https://care--example.gravityrailsites.com/en-US/intake" | site_autologin_link }}
An eligible recipient receives a one-time automatic login to that Site using
existing permissions. The credential lasts 15 minutes; when it cannot be used,
ordinary Site login returns the recipient to the same page. Do not forward a
recipient's link. Use the site_url filter to build a public Site URL from its
slug, and configure the Site's authentication methods for visitors who arrive
without an automatic-login link. See Template Variables
for supported channels and recipient requirements.
After the campaign is submitted
The hosted evidence page is already part of what a submission sends. Once the campaign is submitted, the consent form stays as it was submitted, both in review and after approval. A rejected campaign can still be edited on the campaign page and sent back with Resubmit campaign. Anything uploaded as evidence is published on the brand's public evidence page, so remove any patient information from it before you submit. The form will not take a file down once the campaign is submitted.
Related
- Business Registration — verifying the business behind these numbers, so they can send texts and show your name on calls
- Phone Call Tools — Give AI control over hang up and call forwarding
- Workspace Settings — Configure business hours for call routing
- Sites — Enable browser-based web voice on your sites
Business verification for A2P SMS
Open Organization → Compliance, select the business, and fill in the profile from the checklist.
Required information
- Business details such as legal name, EIN, address, website, contacts, and industry
- Details for one authorized representative; a second is optional
Submission flow
- Fill in the required business details and save them.
- Click Submit for review once the required fields are complete.
- The status banner indicates progress through Twilio review, which typically takes 1–3 business days.
- When Twilio finishes, whoever submitted the profile gets an email saying whether it was approved, with a link back to the business.
Status values
draft— Profile is being preparedpending-review— Submitted and awaiting reviewin-review— Currently under Twilio reviewtwilio-approved— Approved; A2P SMS registration is now unlockedtwilio-rejected— Review failed; edit the profile using the scrubbed reasons shown, then resubmit
After approval, continue with Brand registration on the business's checklist.
A2P Registration
Once the business is approved, a billing owner can start Brand registration on its checklist. Campaign approval and per-number enablement follow as separate steps. It is a paid capability, not a health warning: voice calls and incoming texts continue to work while outbound setup is off or in progress.
Brand registration
- Open Organization → Compliance, select the approved business, and use Brand registration on its checklist.
- In Brand registration, click Register brand. Review the displayed brand name and fees; this dialog uses the business identity already saved and has no Brand Description field.
- Confirm with Register brand and the displayed price. The system submits the brand for carrier review. The campaign — type, samples, and opt-in wording — is the Campaign registration step on that business's checklist. You can write it while the brand is in review. Back returns to the checklist.
The registration/vetting fee is charged when submitted. The recurring Campaign service charge begins only after carrier approval, not while a Campaign is pending or rejected. Carrier fees attach to the Brand/Campaign registration, not to every phone number. Current requirements and provider fees are listed in Twilio's A2P documentation.
Submitting the campaign
The campaign page holds the whole campaign, sample messages included. Save stores it without sending anything, so it can be shared and reviewed first. Once the brand is approved, the checklist's Review and submit opens the campaign page, where Submit campaign for review saves any unsaved edits, asks you to confirm, and sends the campaign to carriers. Approval typically takes 1–5 business days.
Campaign submission and polling
After you submit the campaign, the system submits the A2P campaign to Twilio and begins polling for a carrier decision — often within minutes at first, then less frequently as the wait goes on. You do not need to stay on the page; the status updates automatically.
Registration status values
| Status | What it means |
|---|---|
registering | Brand or campaign submission is in progress |
review_needed | Carrier review requires manual attention; contact support |
pending | Campaign submitted and awaiting carrier approval |
active | Registration approved — outbound texting can be enabled on eligible numbers |
failed | Registration was rejected; check the error details and contact support |
Enable Sending on a Purchased Number
Number purchase and campaign approval are separate from enabling a number to send SMS. An organization admin completes the number attachment here:
- Open the organization's Phone Numbers page. Use the organization inventory, rather than the workspace's Phone Numbers settings.
- Open the number's ⋮ menu. If it is unassigned, choose Assign to workspace, select the intended workspace, and save. Enable sending appears only after the number is assigned.
- Reopen ⋮ → Enable sending. Select the brand whose campaign should carry this number's messages, then click Enable sending. A single eligible brand is preselected.
- Check that the number's SMS/A2P status becomes active. To change an existing attachment, use ⋮ → Change brand.
The brand picker offers only campaigns with carrier status VERIFIED. Brand approval alone is not enough. If no brand is eligible, check the campaign under Organization → Compliance → Business Registration. If the number belongs to a different phone account, the dialog asks you to contact support for migration.
Incoming texts remain separately controlled by the number's Receive texts setting.
Note: The
timed_outstatus may appear if polling exceeds the expected window. Contact support if registration remains in this state.
SMS Consent Setup
The campaign is written, saved and submitted on its campaign page: open Organization → Compliance, select your business, then open Campaign registration on its checklist. Submitting the campaign submits the hosted evidence page, which is already generated from the defaults; change its wording there, or point carriers at your own public page, before you submit. Once the campaign is submitted, the form stays as it was submitted, in review and after approval. It is available once an A2P brand exists (see A2P Registration above).
How the consent model works
The opt-in checkbox label you set here is the single source of truth: the patient enrollment form, the A2P evidence page sent to TCR, and the campaign MessageFlow are all generated from it. Keeping them in sync is automatic. The evidence page matches the real form once you have pointed carriers at your own page. Until then the hosted page is the healthcare attestation.
Consent text fields
| Field | What it controls |
|---|---|
| Opt-in checkbox label | The exact line a patient checks to agree to SMS. Quoted verbatim in the MessageFlow submitted to TCR. |
| Disclosure | Supplementary text shown beneath the checkbox — optionality notice, message frequency, data rates, and opt-out instructions (e.g. "Reply STOP to opt out or HELP for help"). |
After editing either field, click Save to persist the overrides. The Live preview panel on the right updates the rendered enrollment-form checkbox as you type, and refreshes the MessageFlow preview after you save.
Default opt-in / opt-out / help keywords
Carriers require that standard keywords trigger the corresponding automated responses:
| Keyword | Effect |
|---|---|
STOP | Member opts out; automatic opt-out reply sent |
START | Re-subscribes a previously opted-out member |
HELP | Automatic help reply sent with support contact |
These keywords are pre-configured as carrier defaults and do not need to be listed in the disclosure text unless you want to surface them explicitly to patients.
Multi-brand organizations
A business can have more than one brand: the same legal entity, different sender names. Today a business holds one brand: the checklist opens the brand already on file, and it can't start a second one yet. Another business is a different checklist, reached from the business switcher or from the business list when the organization has more than one.
Enrollment sites, how they are linked, and what stays put after a campaign is submitted are in Enrollment Site Setup above.
For developers
- Phone Numbers API — provision, list, and configure phone numbers programmatically
- Recordings API — access call recordings programmatically