Authentication
Gravity Rail supports two authentication methods: OAuth 2.0 for third-party applications and API Keys for direct API access.
OAuth 2.0 (Recommended for Apps)
OAuth 2.0 is the recommended authentication method for third-party applications that need to access Gravity Rail on behalf of users.
Why Use OAuth 2.0?
OAuth enables your users to securely connect their Gravity Rail accounts to your application without sharing their passwords. This provides several key benefits:
- Secure User Access: Users can authorize your app to access Gravity Rail's extensive APIs on their behalf
- Comprehensive API Access: Build powerful integrations using Gravity Rail's APIs for data import/export, task management, workflow automation, and more
- User Control: Users can revoke access to your app at any time from their settings
- Fine-Grained Permissions: Request only the specific permissions (scopes) your application needs
- Industry Standard: OAuth 2.0 is a proven security standard used by major platforms worldwide
Prerequisites: Create a Builder Profile
Before you can create your first OAuth app, you need to establish your developer identity by creating a Builder Profile. This profile represents you or your organization as an app developer.
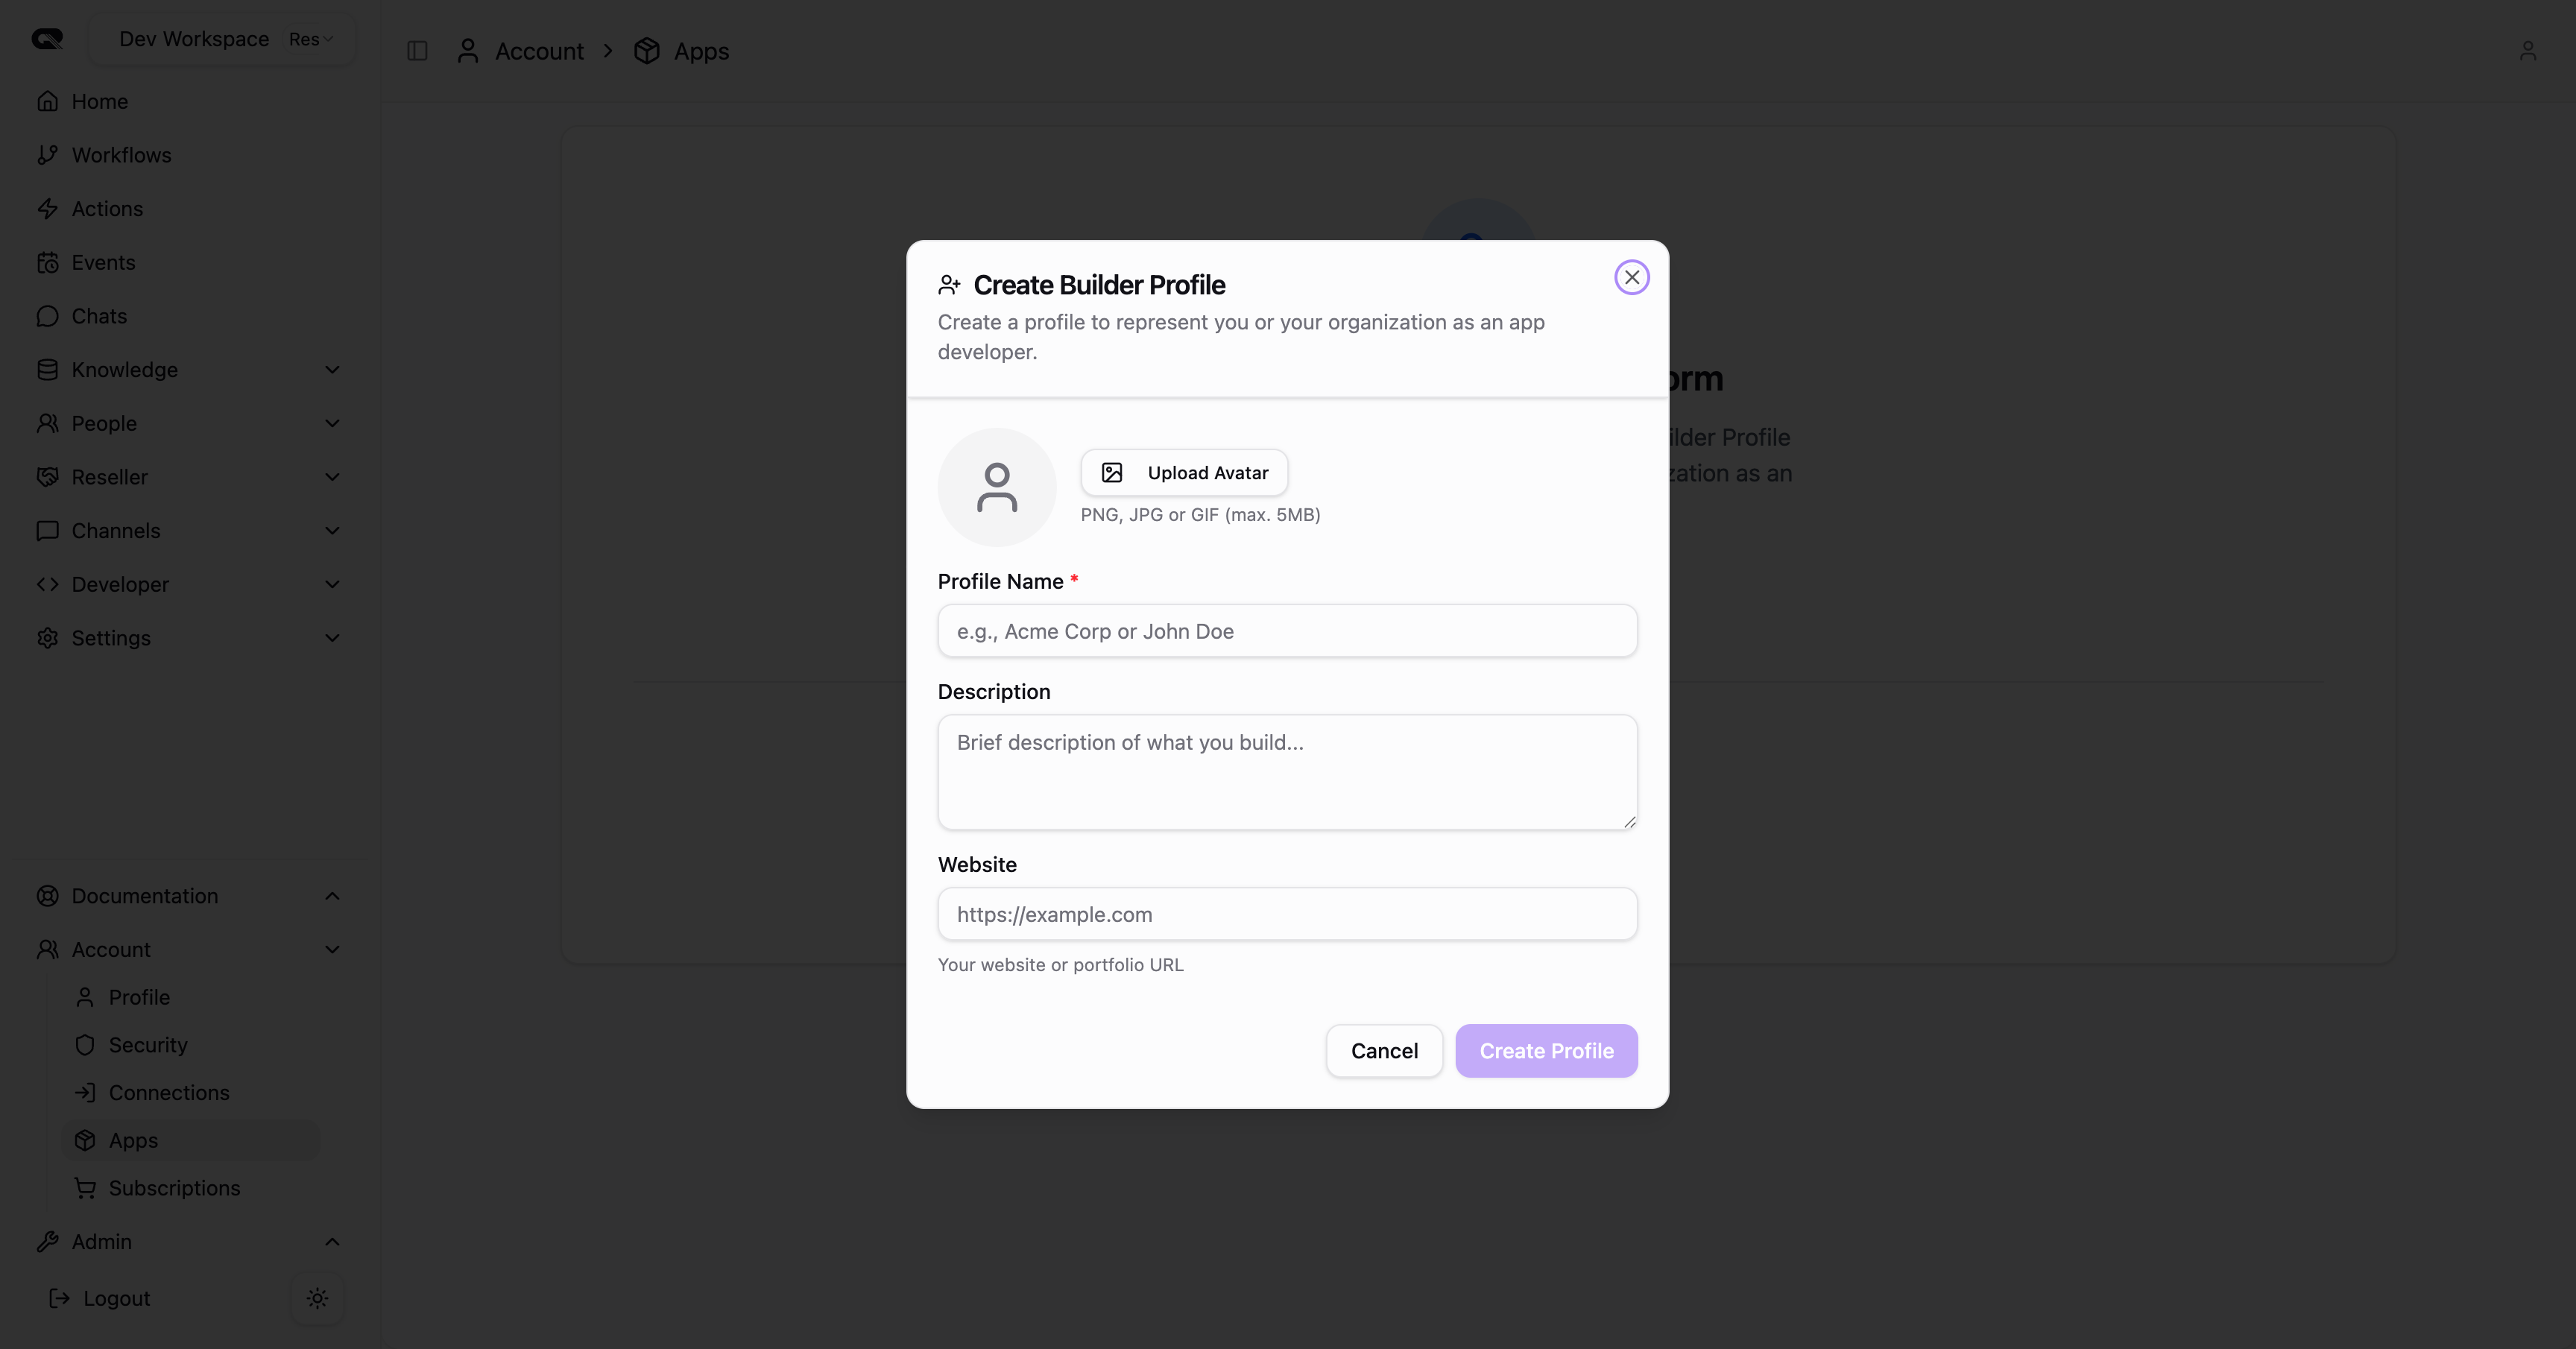
To create a Builder Profile:
- Log in to your Gravity Rail account
- Open your account menu (top-right) and go to Account → Apps tab
- You'll see a welcome screen prompting you to create a Builder Profile
- Click "Create Builder Profile" and fill in:
- Profile Name (required): Your name or organization name (e.g., "Acme Inc")
- Description (optional): What kind of integrations you're building
- Website (optional): Your website or company URL
Once created, your Builder Profile will be associated with all apps you develop.
Creating an OAuth App
After setting up your Builder Profile, you can create OAuth applications:
- Go to Account → Apps tab and select the Apps sub-tab
- Click "Create Application"
- Fill in the app creation form across four tabs:
General Tab
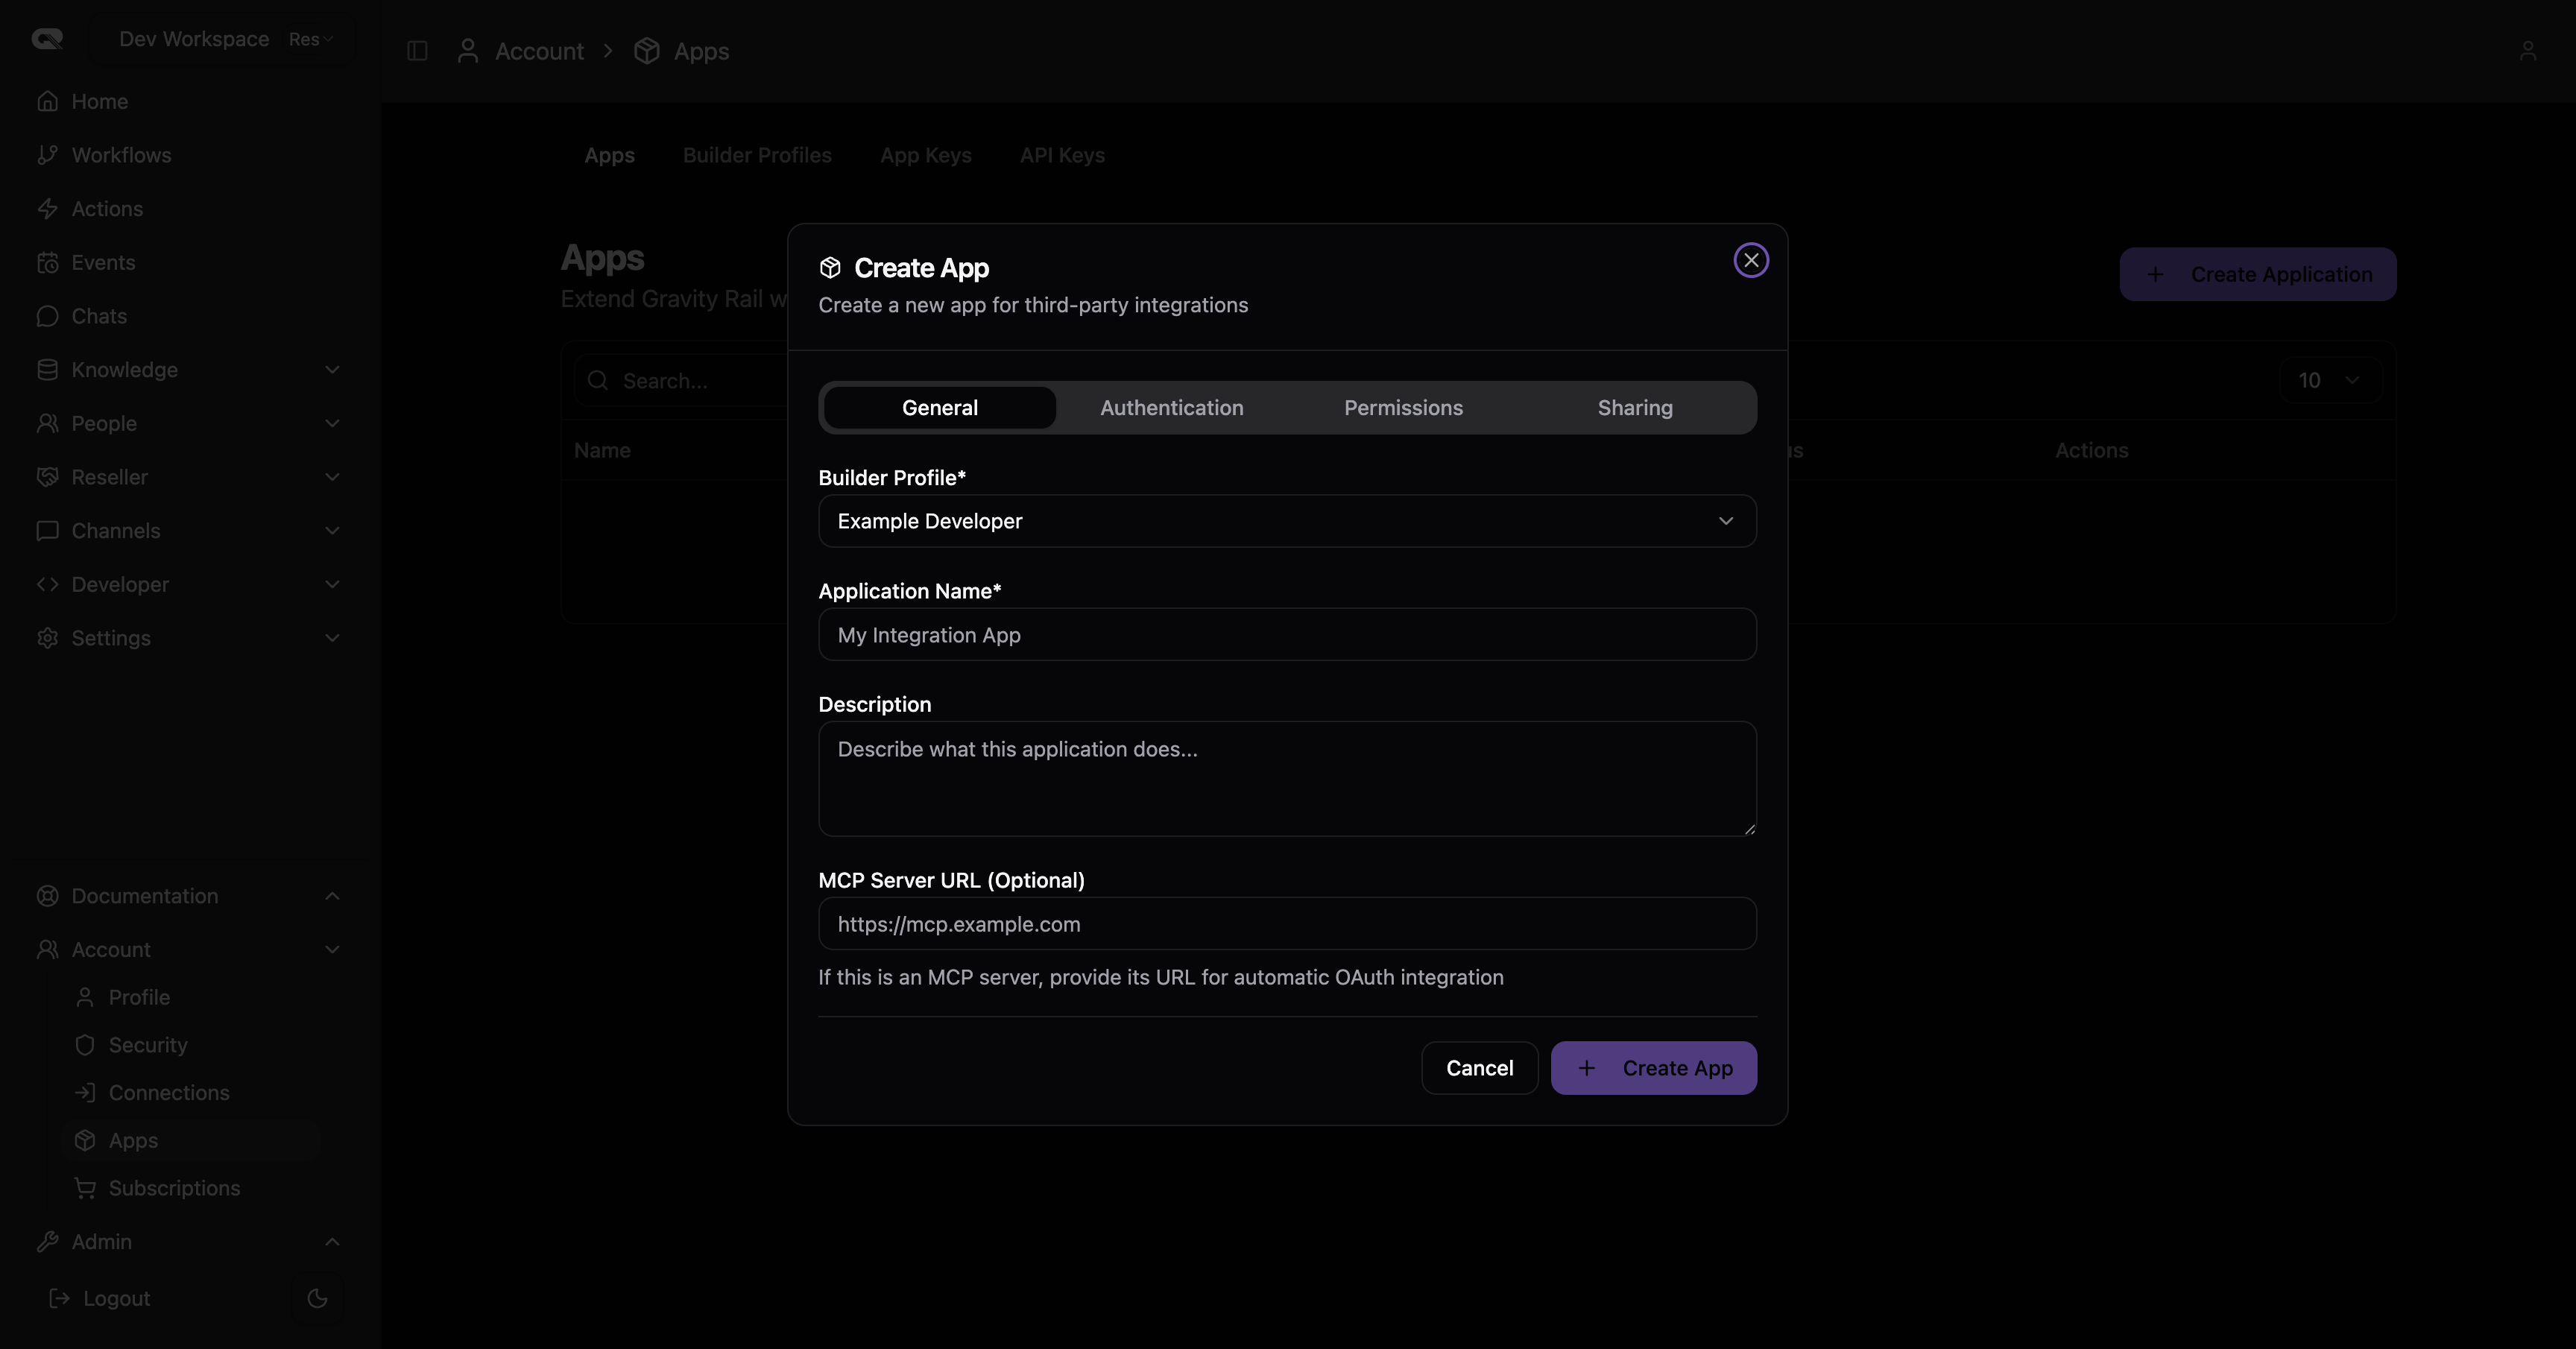
Configure basic app information:
- Builder Profile (required): Select your Builder Profile from the dropdown
- Application Name (required): A descriptive name for your app (e.g., "Project Management Sync")
- Description (optional): What your application does and how it integrates with Gravity Rail
- MCP Server URL (optional): If building an MCP (Model Context Protocol) server, provide its URL for automatic OAuth integration
Authentication Tab
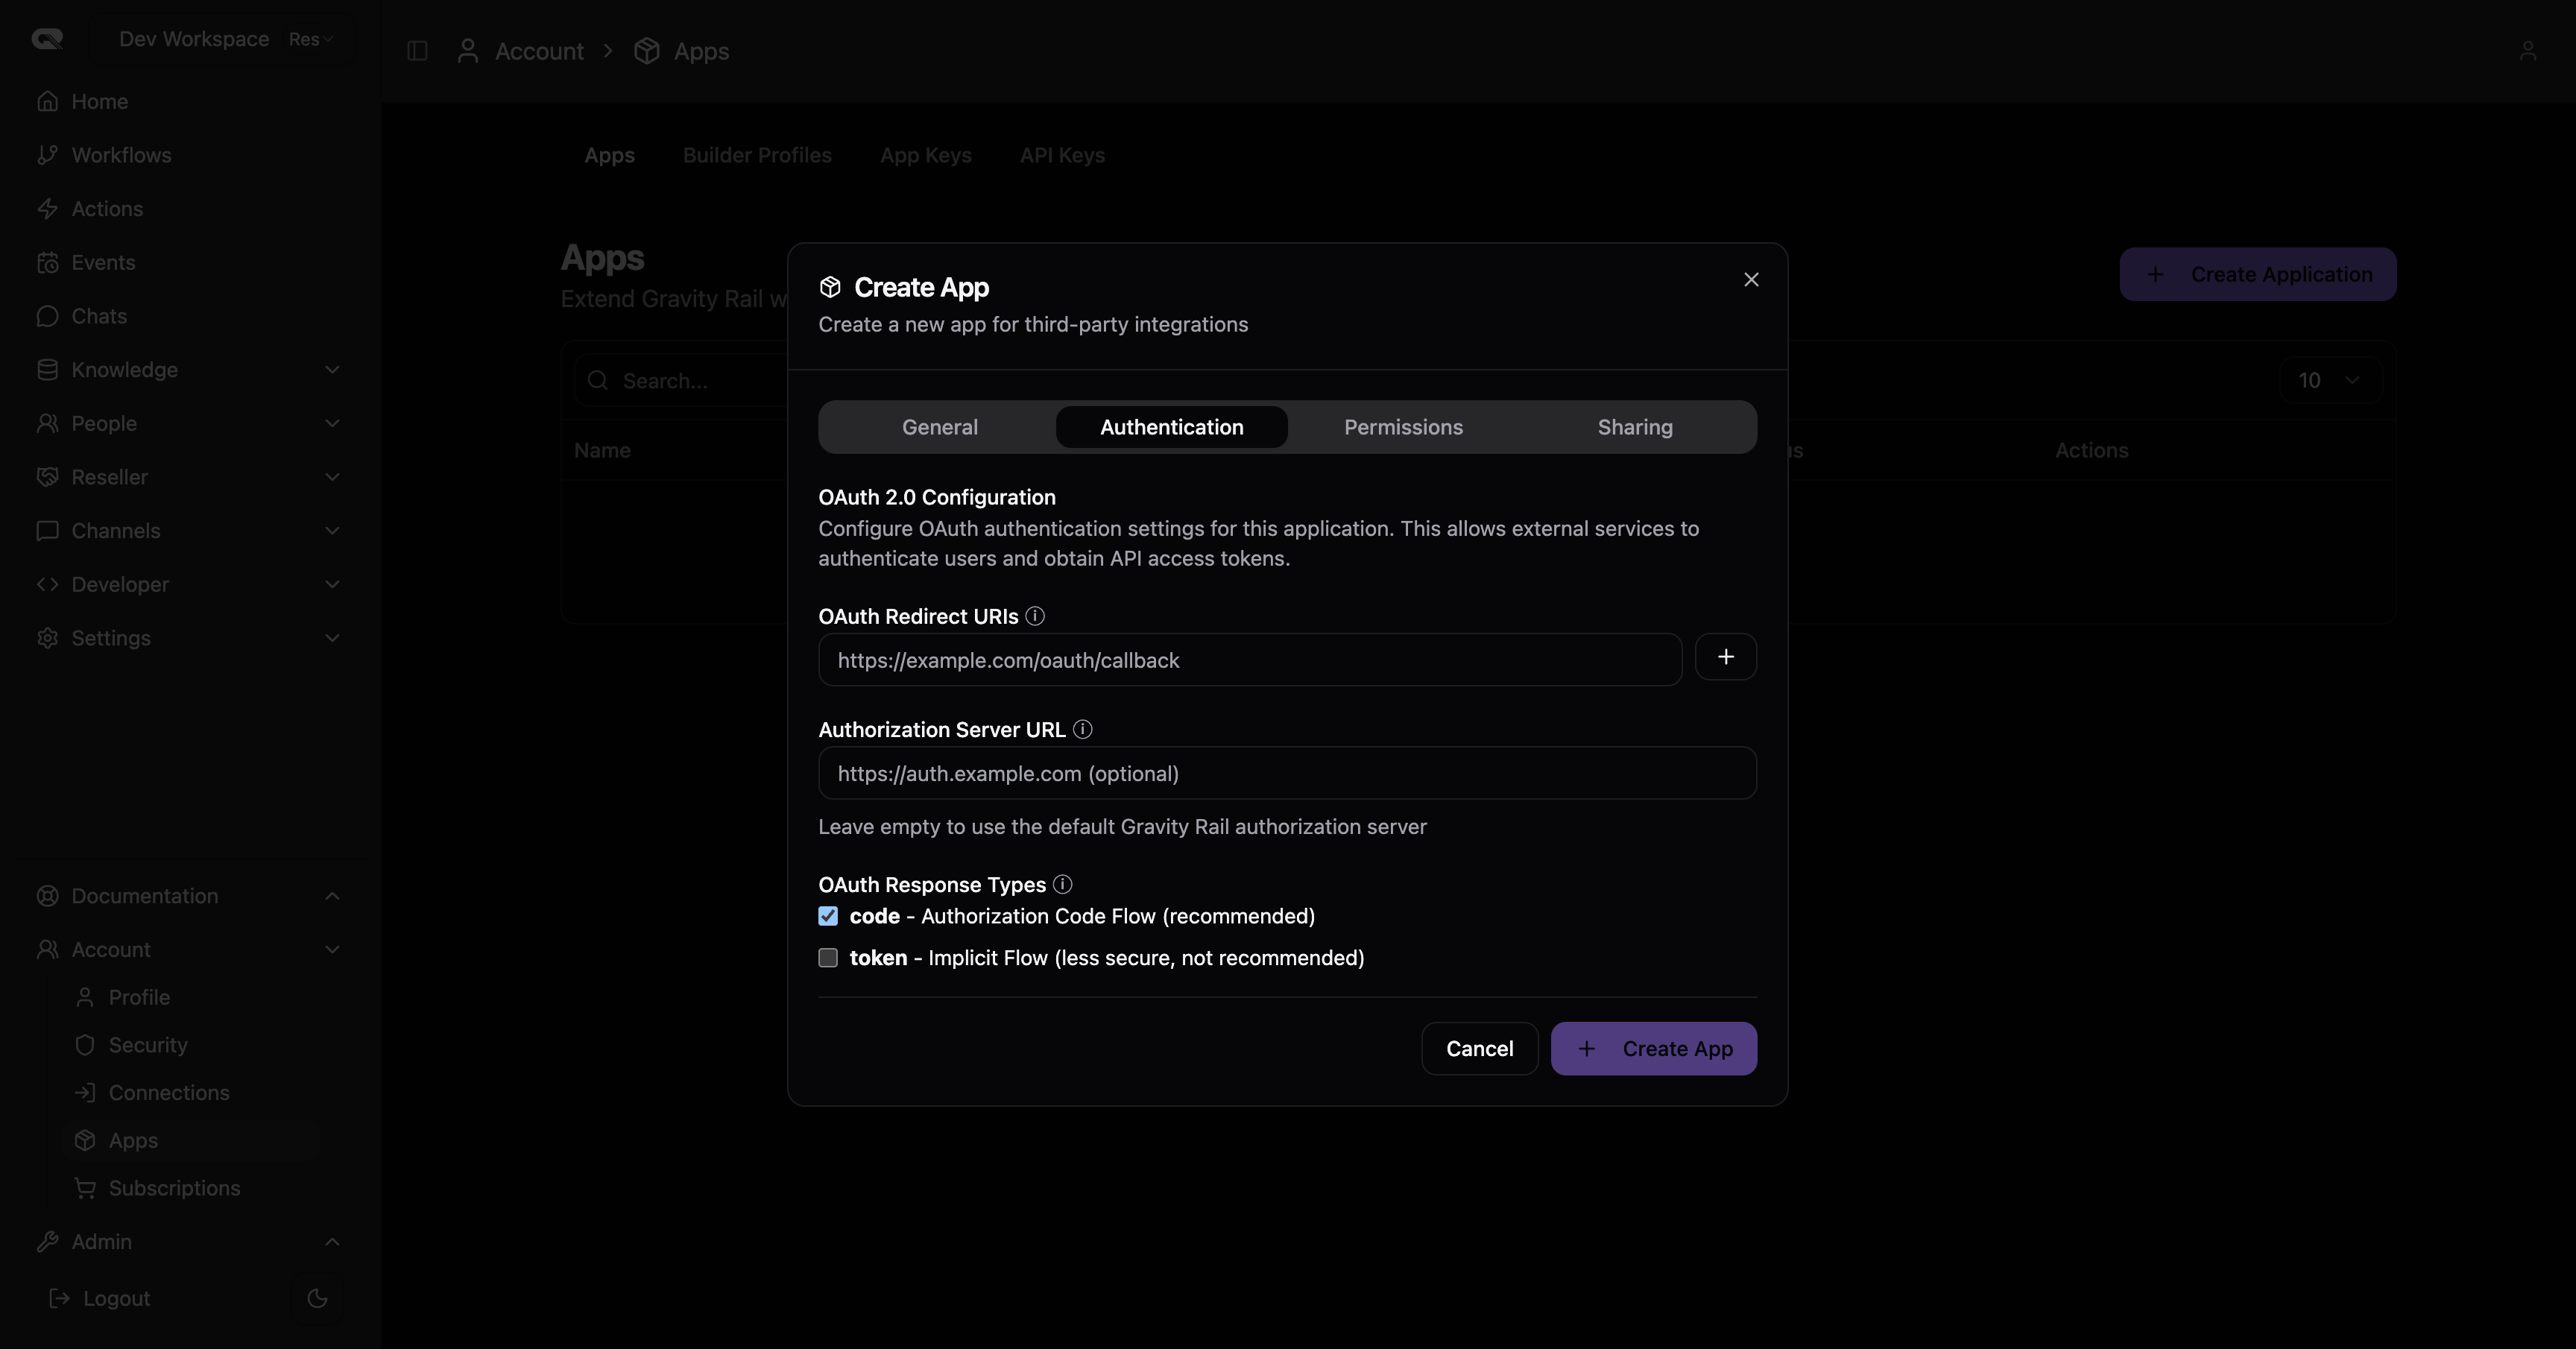
Configure OAuth 2.0 settings:
- OAuth Redirect URIs: Add one or more callback URLs where users will be redirected after authorization (e.g.,
https://yourapp.com/oauth/callback) - Authorization Server URL (optional): Leave empty to use Gravity Rail's default authorization server
- OAuth Response Types:
- code - Authorization Code Flow (recommended) - checked by default
- token - Implicit Flow (less secure, not recommended)
Permissions Tab
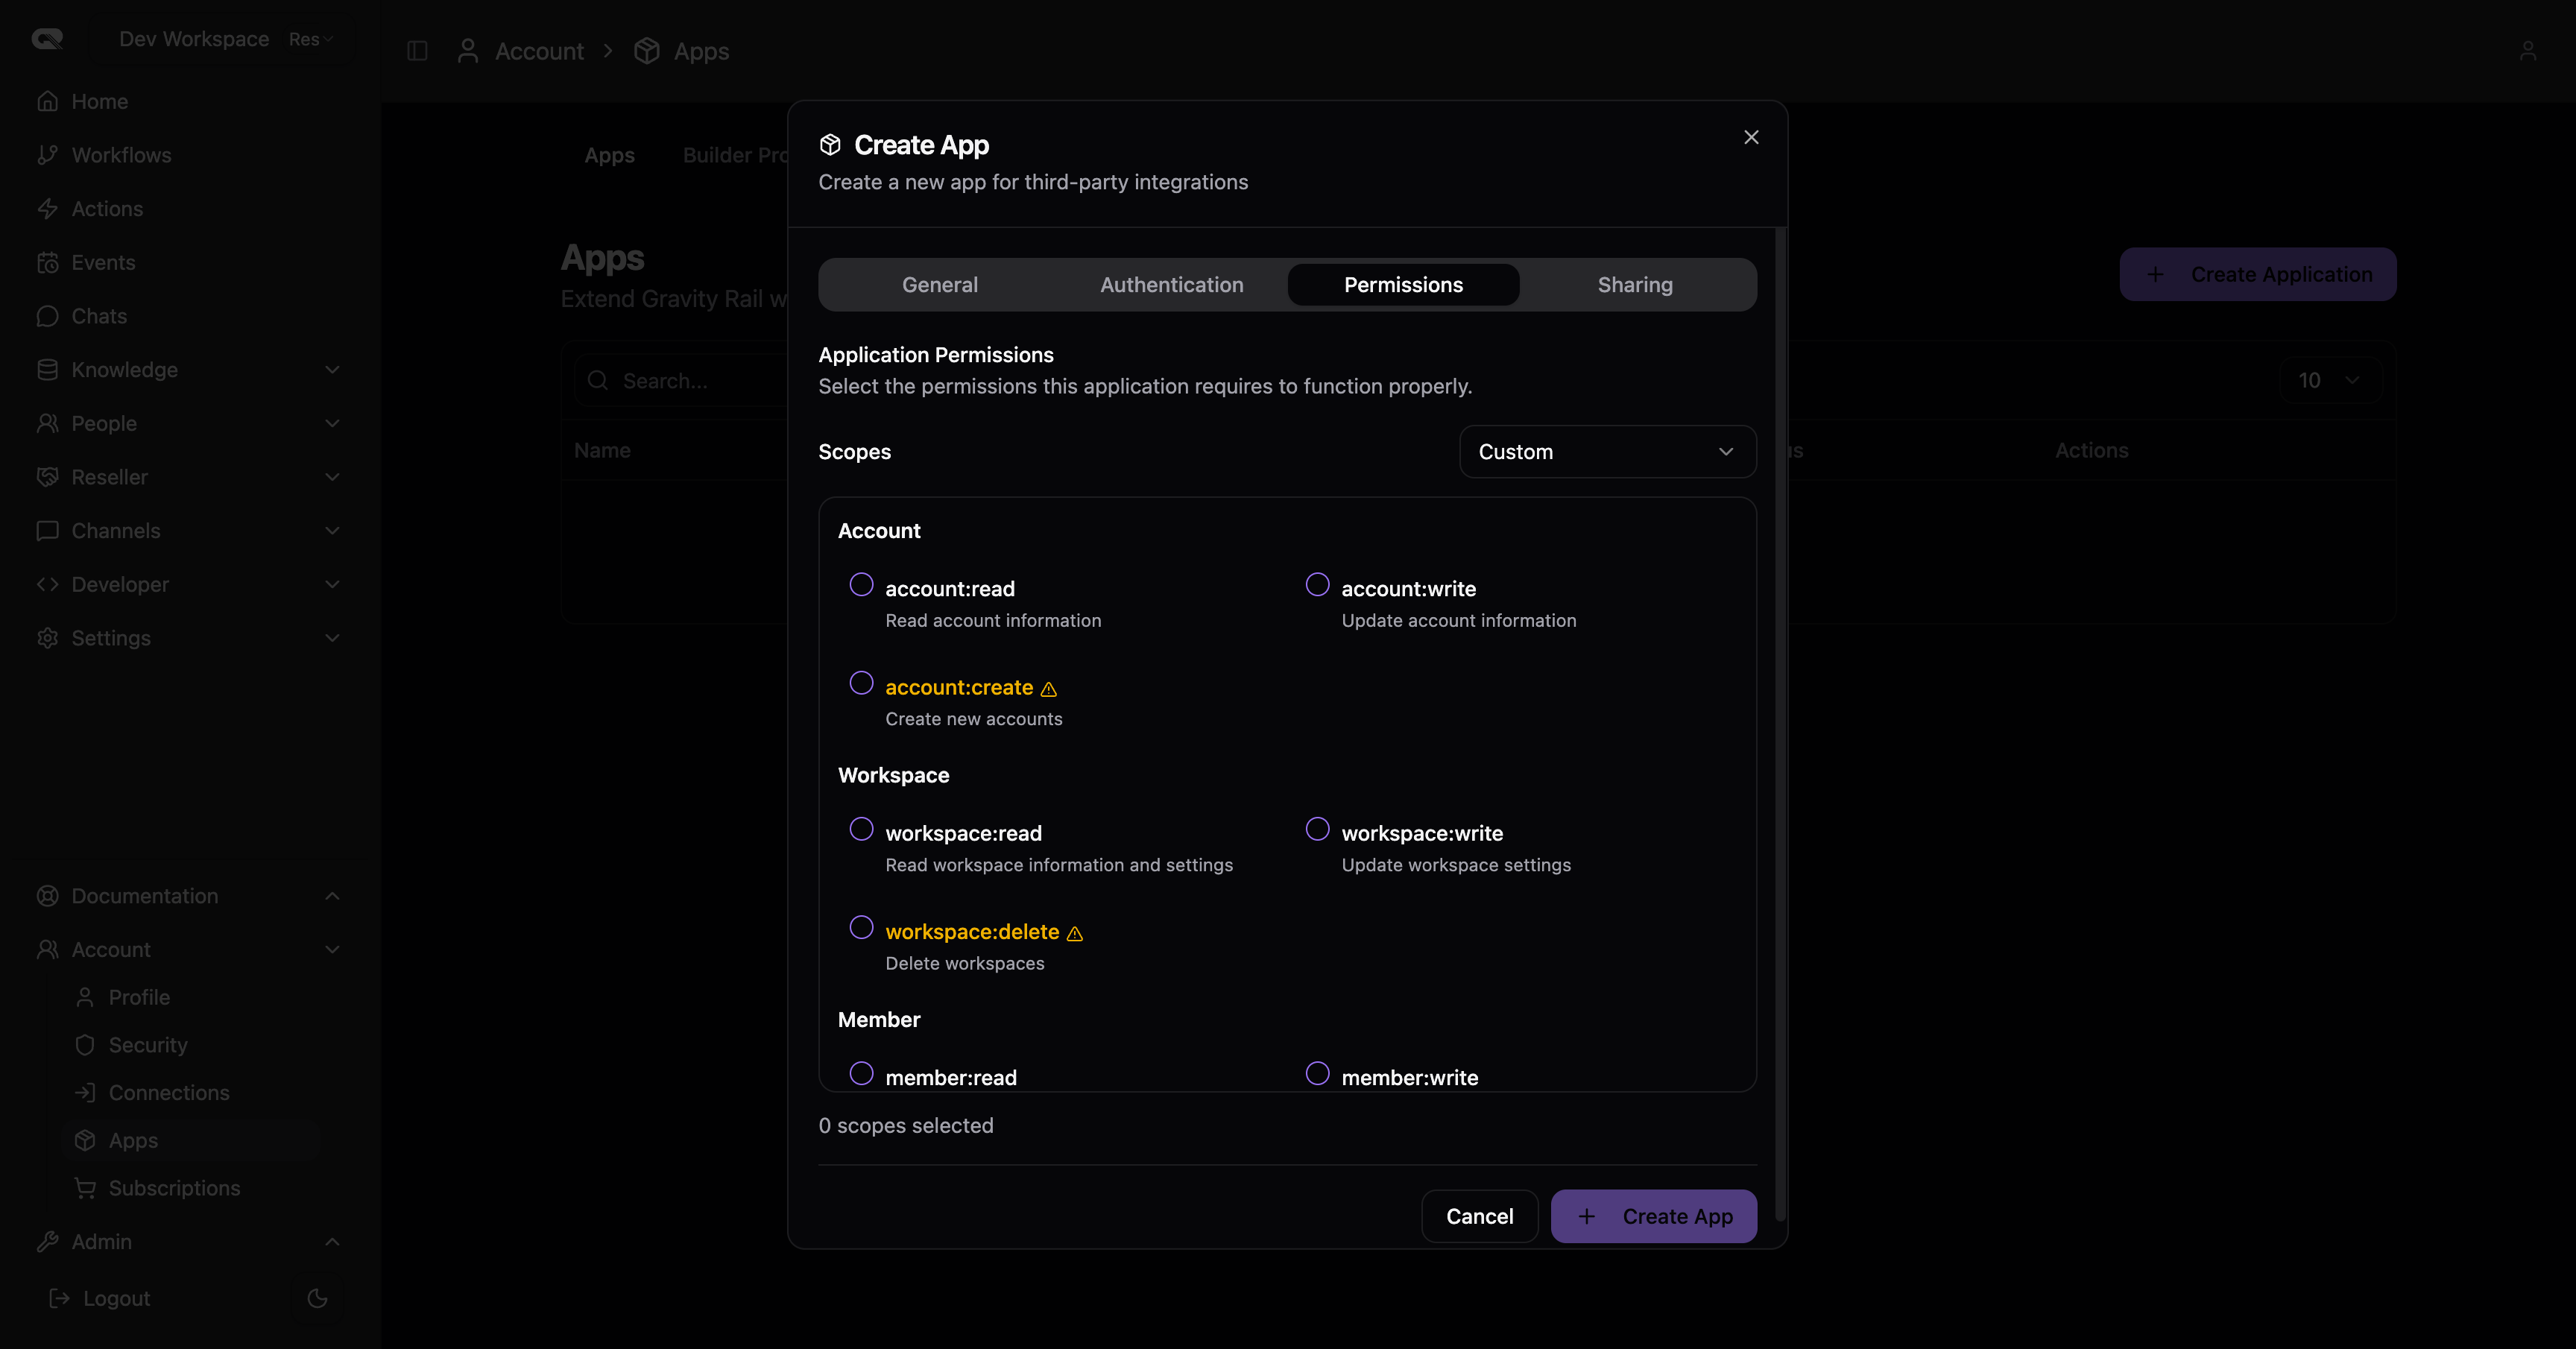
Select the OAuth scopes your application needs. Available scopes are organized by category:
- Account:
account:read,account:write,account:create - Workspace:
workspace:read,workspace:write,workspace:delete - Member:
members:read,members:write,members:admin - Agent:
assistants:read,assistants:write,assistants:admin - Data:
data:read,data:write,data:delete,data:admin - Task:
task:read,task:write,task:delete,task:execute - Chat:
chats:read,chats:write,chats:admin - Workflow:
workflows:read,workflows:write,workflows:delete - Site:
sites:read,sites:write,sites:publish - Export:
export:read,export:read-all - Admin:
admin:superuser
Choose only the permissions your app actually needs following the principle of least privilege.
Sharing Tab
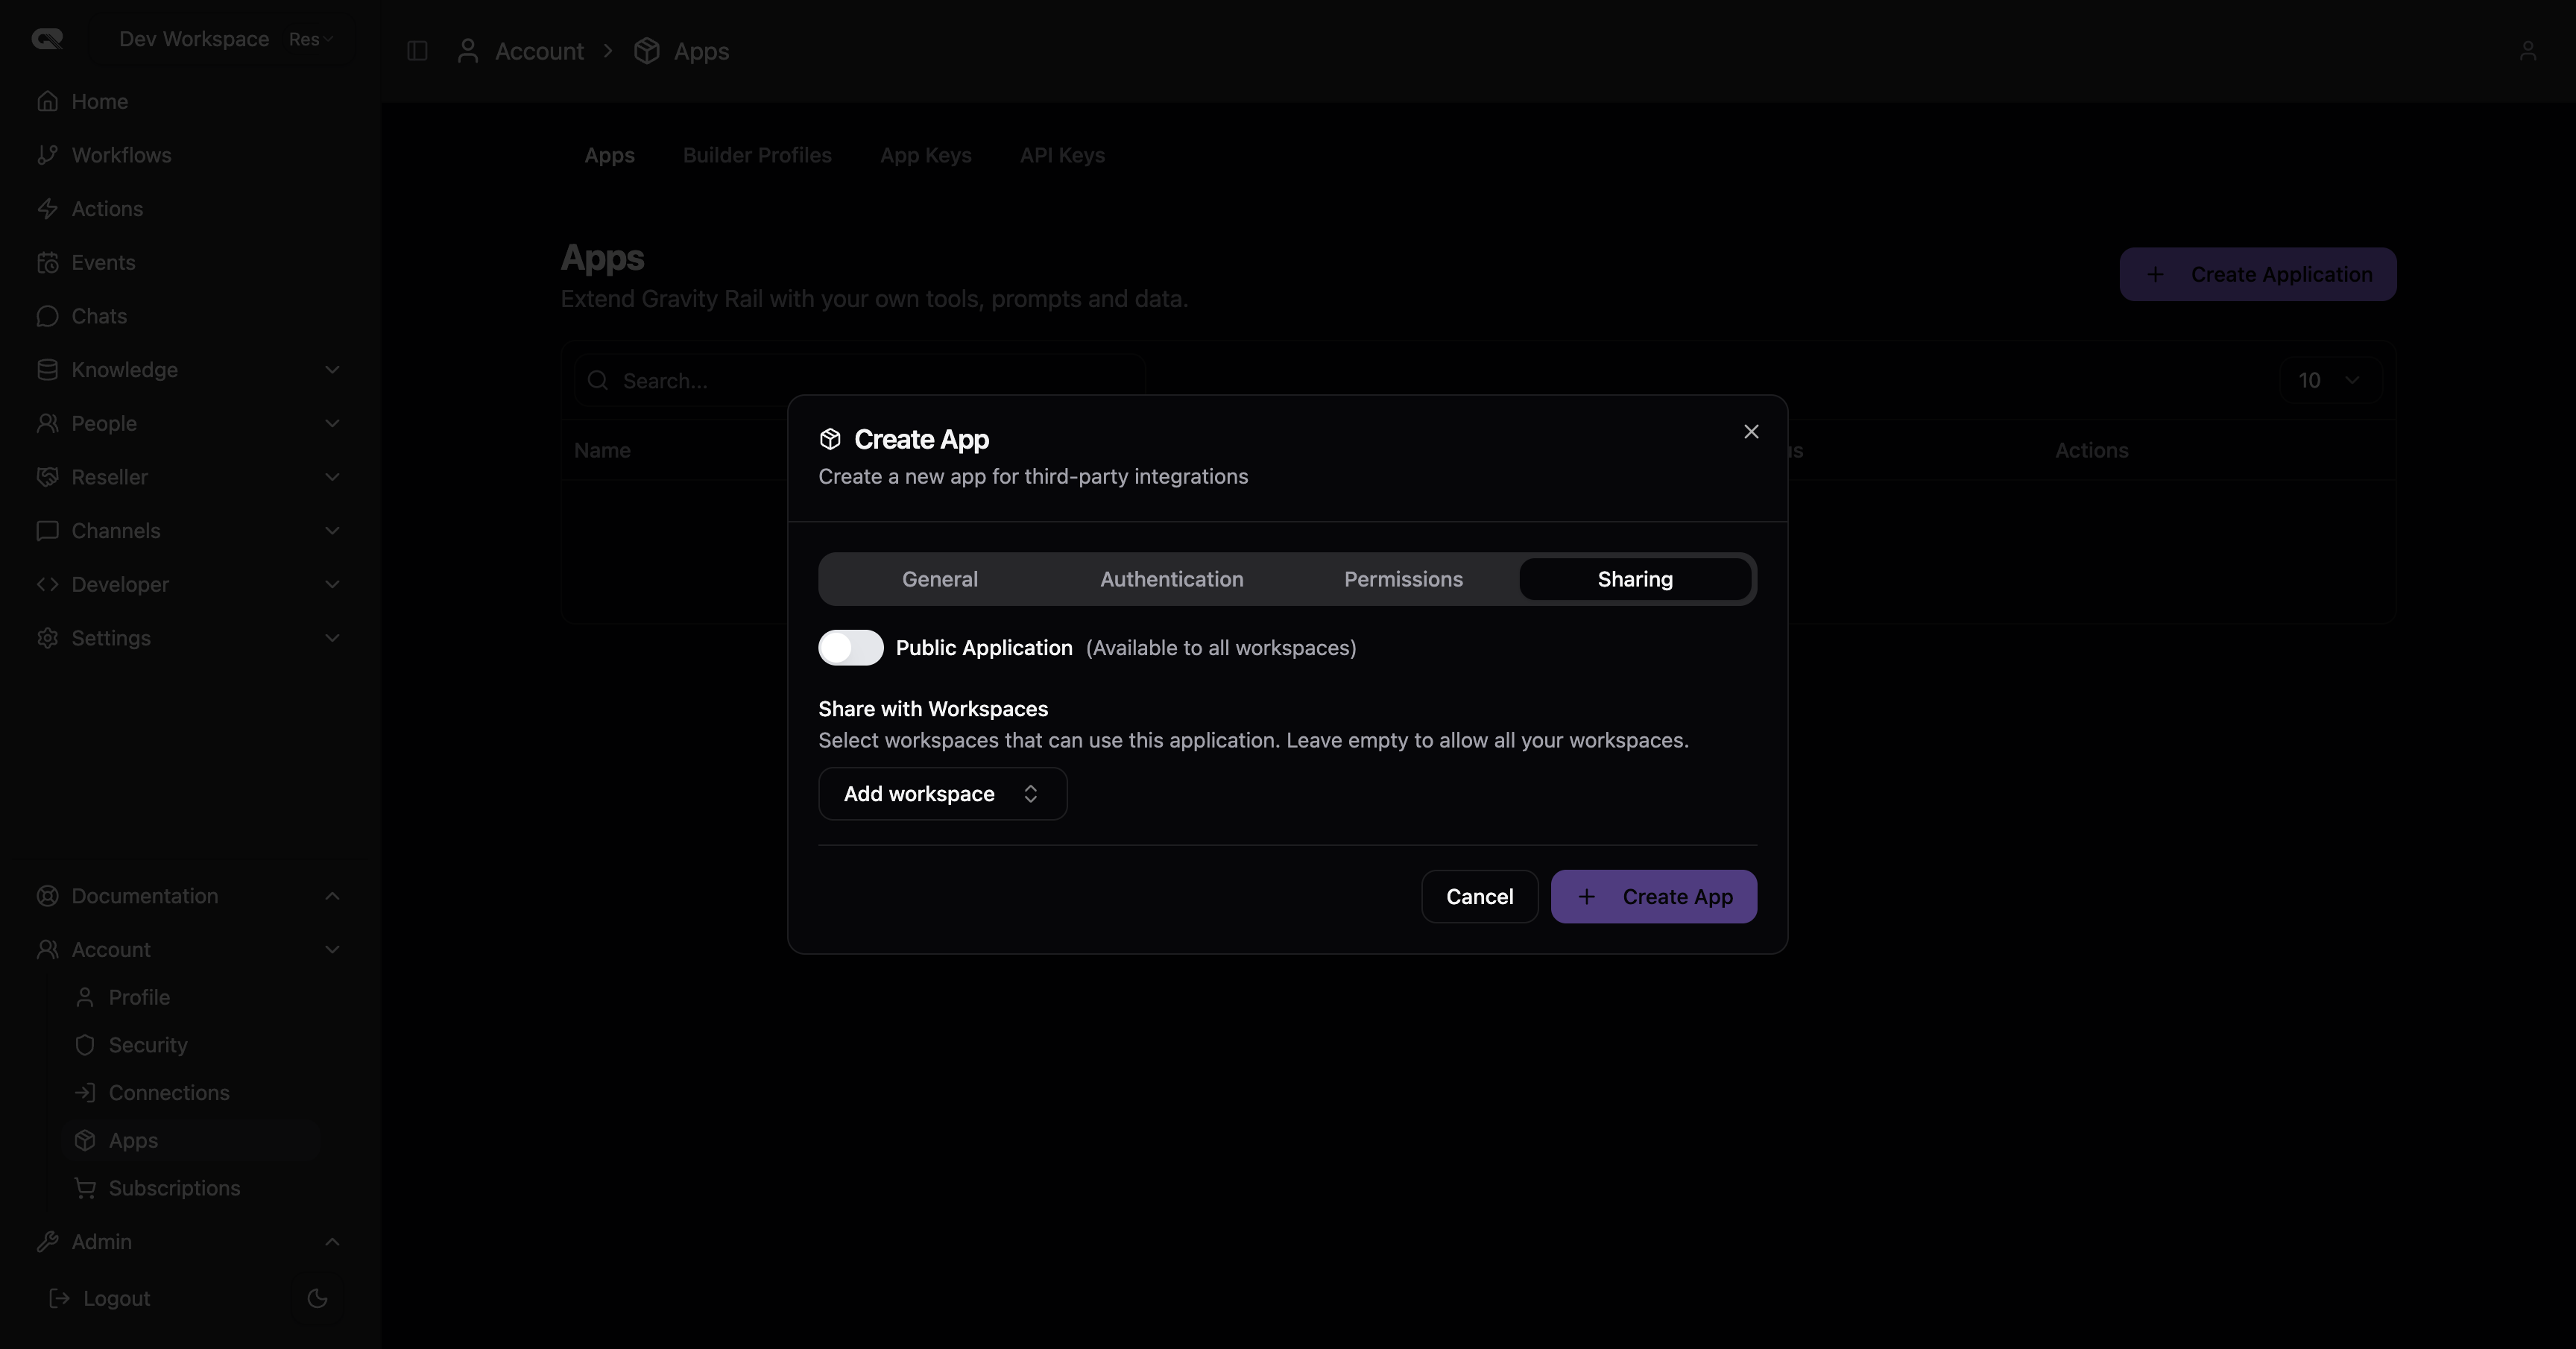
Control app visibility and access:
- Public Application: Toggle to make your app available to all workspaces
- Share with Workspaces: If not public, select specific workspaces that can use your app (leave empty to allow all your workspaces)
- Click "Create App" to save
After creation, you'll receive:
- Client ID: Public identifier for your app (format:
gr_app_...) - Client Secret: Private secret for confidential clients (format:
gr_app_priv_...)
Important: Copy and securely store your Client Secret immediately - you won't be able to view it again!
OAuth 2.0 Authorization Flow
Gravity Rail implements the OAuth 2.0 Authorization Code flow with PKCE support for enhanced security.
Step 1: Authorization Request
Redirect users to the authorization endpoint:
https://api.gravityrail.com/api/v2/oauth/authorize?
  response_type=code&
  client_id=YOUR_CLIENT_ID&
  redirect_uri=YOUR_REDIRECT_URI&
  scope=REQUESTED_SCOPES&
  state=RANDOM_STATE&
  code_challenge=YOUR_CODE_CHALLENGE&
  code_challenge_method=S256
Step 2: User Authorization
Users will be presented with a consent screen to approve your app's access.
Step 3: Authorization Code
After approval, users are redirected to your redirect_uri with an authorization code:
https://yourapp.com/callback?code=AUTHORIZATION_CODE&state=RANDOM_STATE
Step 4: Exchange Code for Token
Exchange the authorization code for an access token:
curl -X POST https://api.gravityrail.com/api/v2/oauth/token \
  -H "Content-Type: application/x-www-form-urlencoded" \
  -d "grant_type=authorization_code" \
  -d "code=AUTHORIZATION_CODE" \
  -d "redirect_uri=YOUR_REDIRECT_URI" \
  -d "client_id=YOUR_CLIENT_ID" \
  -d "client_secret=YOUR_CLIENT_SECRET" \
  -d "code_verifier=YOUR_CODE_VERIFIER"
Step 5: Use Access Token
Include the access token in API requests:
curl https://api.gravityrail.com/api/v2/workflows \
  -H "Authorization: Bearer ACCESS_TOKEN"
PKCE (Proof Key for Code Exchange)
PKCE is required for public clients (mobile/desktop apps) and recommended for all OAuth flows.
- Generate a random
code_verifier - Create
code_challenge= BASE64URL(SHA256(code_verifier)) - Use
code_challenge_method=S256
API Keys (Direct Access)
For server-to-server integrations or direct API access, you can use API keys.
Creating an API Key
- Log in to your Gravity Rail account
- Open Settings (top-right) and select API Keys under the Developer section
- Click Create API Key
- Name the key, choose scopes and expiration, then create it
- Copy and securely store your API key — the full secret is shown once
Using API Keys
Include your API key in the Authorization header:
curl https://api.gravityrail.com/api/v2/workflows \
  -H "Authorization: Bearer YOUR_API_KEY"
SMART on FHIR Backend Services (Healthcare Integrations)
For healthcare integrators connecting Gravity Rail to EHR systems such as eClinicalWorks, Epic, or Cerner, Gravity Rail supports SMART on FHIR Backend Services authentication using asymmetric client authentication (private_key_jwt).
Use this auth method when you need to verify Gravity Rail-issued JWTs, or when an EHR requires registering a JWKS URL for your tenant.
JWKS Endpoint
Gravity Rail publishes its public signing keys at:
https://api.gravityrail.com/.well-known/jwks.json
The endpoint returns a JWK Set (RFC 7517) with one or more public keys:
{
  "keys": [
    {
      "kty": "RSA",
      "use": "sig",
      "alg": "RS384",
      "kid": "a1b2c3d4e5f6g7h8",
      "n": "...",
      "e": "AQAB"
    }
  ]
}
- Algorithm:
RS384(RSA with SHA-384) — required by the SMART on FHIR spec - Key size: 3072 bits
- Caching: the endpoint sets
Cache-Control: public, max-age=3600; respect it and refresh at least hourly so key rotations are picked up - Rotation: multiple keys may appear in the set during rotation windows — always select by
kid, not array position
OAuth Discovery
Client capabilities and the jwks_uri are advertised via OAuth 2.0 Authorization Server Metadata (RFC 8414):
https://api.gravityrail.com/.well-known/oauth-authorization-server
Relevant fields:
| Field | Value |
|---|---|
jwks_uri | https://api.gravityrail.com/.well-known/jwks.json |
token_endpoint_auth_methods_supported | includes private_key_jwt |
token_endpoint_auth_signing_alg_values_supported | ["RS384", "ES384"] |
When to Use private_key_jwt vs API Keys
| Scenario | Recommended auth |
|---|---|
| SMART on FHIR backend services integration with an EHR | private_key_jwt + JWKS |
| Third-party service that needs to verify a Gravity Rail JWT | Fetch JWKS, verify with RS384 |
| Generic server-to-server REST calls | API Keys |
| User-delegated access from a third-party app | OAuth 2.0 authorization code flow |
Verifying a Gravity Rail JWT
Use PyJWKClient so the correct key is selected by the JWT's kid header and the JWKS is cached between calls:
import jwt
from jwt import PyJWKClient

jwks_client = PyJWKClient("https://api.gravityrail.com/.well-known/jwks.json")

signing_key = jwks_client.get_signing_key_from_jwt(token)

decoded = jwt.decode(
    token,
    signing_key.key,
    algorithms=["RS384"],
    audience="your-audience",
)
PyJWKClient refreshes the key set when an unknown kid is seen, which handles Gravity Rail's key rotations transparently.
Security Best Practices
For OAuth Apps
- Store client secrets securely - Never expose in client-side code
- Use PKCE for all public clients (mobile/desktop apps)
- Validate redirect URIs - Only use registered URIs
- Implement state parameter - Prevent CSRF attacks
- Use HTTPS - All redirect URIs must use HTTPS (except localhost)
For API Keys
- Never expose API keys in client-side code or version control
- Use environment variables to store API keys
- Rotate keys regularly for enhanced security
- Revoke compromised keys immediately via Settings → API Keys (workspace keys) or Account → Apps → API Keys (account-level keys)
- Use workspace-specific keys when possible for principle of least privilege
Code Examples
OAuth Example: Node.js
// Step 1: Redirect to authorization
const authUrl = new URL('https://api.gravityrail.com/api/v2/oauth/authorize');
authUrl.searchParams.set('response_type', 'code');
authUrl.searchParams.set('client_id', process.env.CLIENT_ID);
authUrl.searchParams.set('redirect_uri', 'https://yourapp.com/callback');
authUrl.searchParams.set('scope', 'workflows:read workflows:write');
authUrl.searchParams.set('state', randomState);

// Step 2: Handle callback and exchange code
const tokenResponse = await fetch('https://api.gravityrail.com/api/v2/oauth/token', {
   method: 'POST',
   headers: {
      'Content-Type': 'application/x-www-form-urlencoded',
   },
   body: new URLSearchParams({
      grant_type: 'authorization_code',
      code: authCode,
      redirect_uri: 'https://yourapp.com/callback',
      client_id: process.env.CLIENT_ID,
      client_secret: process.env.CLIENT_SECRET,
   }),
});

const { access_token } = await tokenResponse.json();

// Step 3: Use access token
const response = await fetch('https://api.gravityrail.com/api/v2/workflows', {
   headers: {
      Authorization: `Bearer ${access_token}`,
      'Content-Type': 'application/json',
   },
});
API Key Example: Python
import os
import requests

GRAVITYRAIL_API_KEY = os.environ.get('GRAVITYRAIL_API_KEY')

headers = {
    'Authorization': f'Bearer {GRAVITYRAIL_API_KEY}',
    'Content-Type': 'application/json'
}

response = requests.get(
    'https://api.gravityrail.com/api/v2/workflows',
    headers=headers
)

workflows = response.json()