Member enrollment
Route new enrollments to a welcome or a missing-information follow-up. Start with the free solution template, then adapt it to your team's process.
What you install
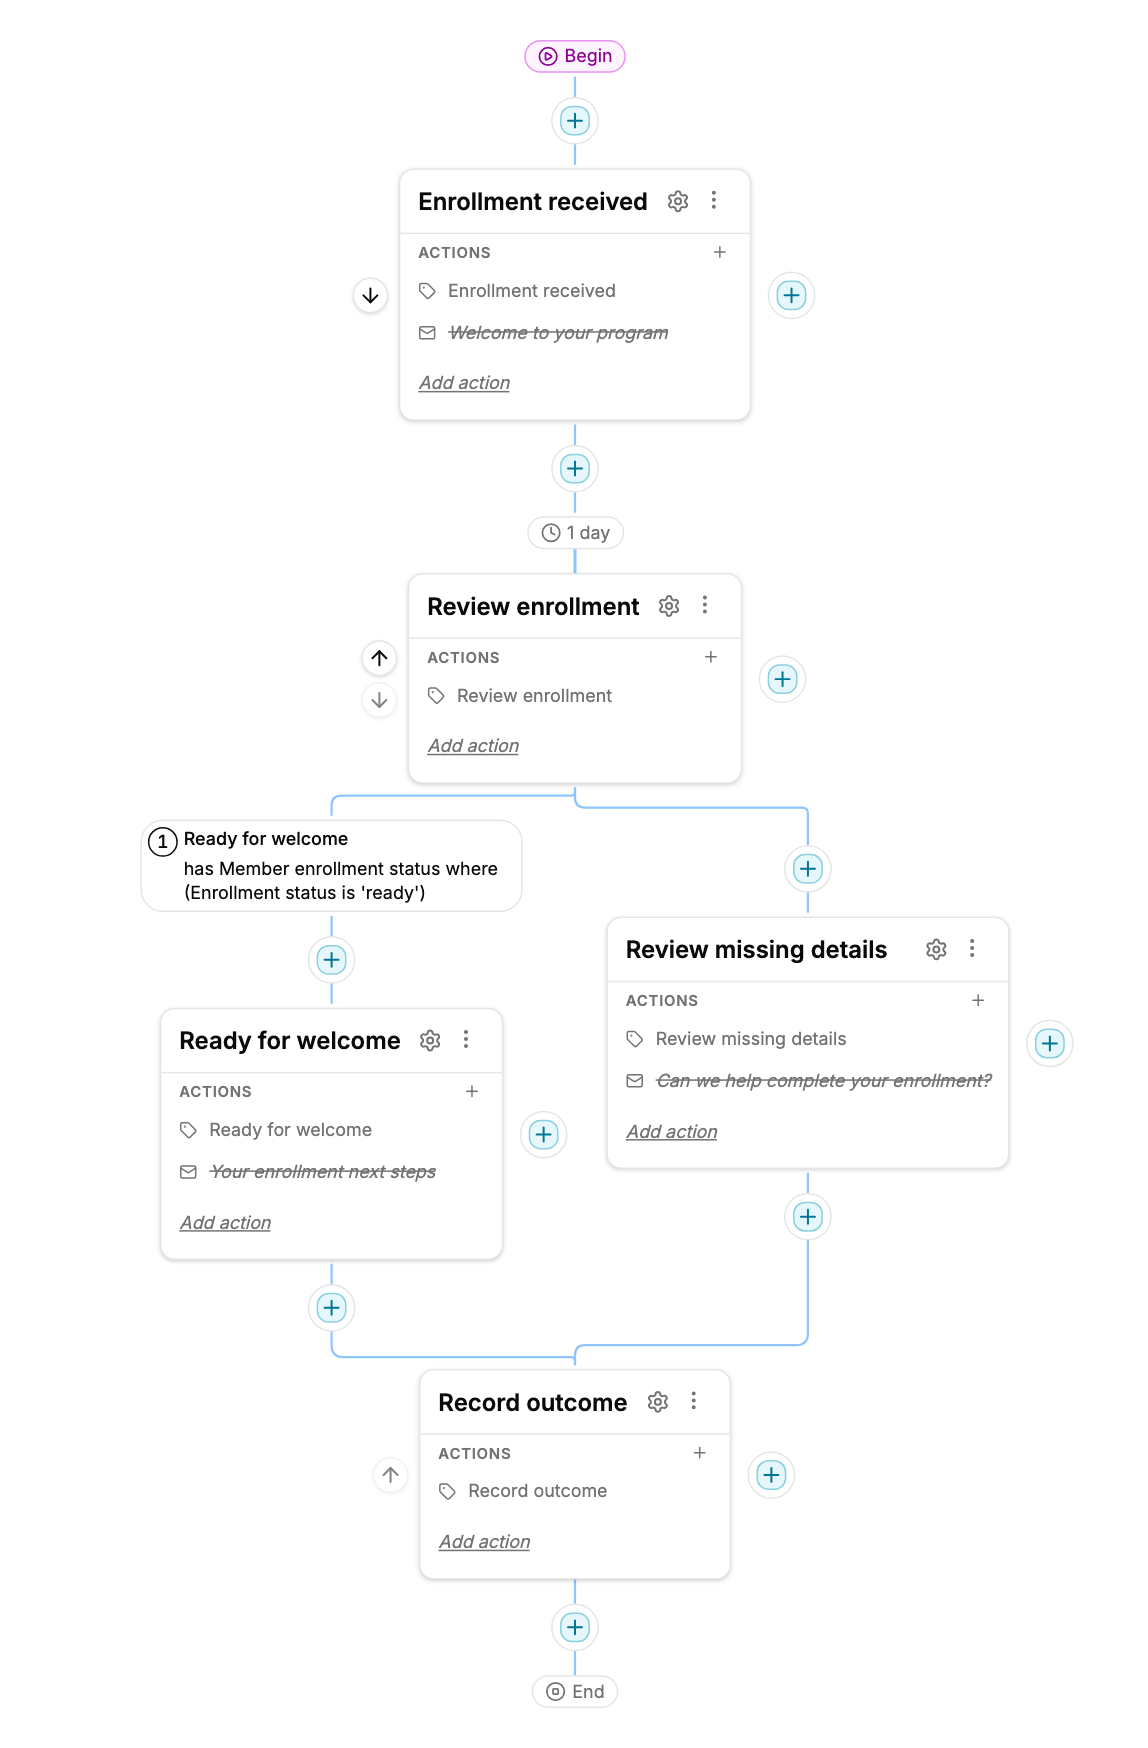
- A Journey V2 with five steps and two alternative paths.
- The Member enrollment status Form, with Enrollment status.
- A branch condition saved inside the Journey.
- Three editable email actions, initially inactive.
- A 1-day wait before checking the branch condition.
- Internal labels that record the steps each member reaches.
- A separate Stop this Journey ending.
The Journey installs as a draft, with automatic enrollment off. Choose an authorized Inbox during installation. The supplied email actions stay inactive until you review and enable them. The bundle is free; workspace subscriptions and usage charges are separate.
Install and inspect
- Select Add to workspace — free on the solution page.
- Sign in and choose the workspace where you want the draft.
- Select the Inbox your team will use, then open the installed Journey and inspect its steps and actions.
- Open the condition after Review enrollment. Under Match, inspect Enrollment status is ready.
Matching members follow Ready for welcome. Other members follow Review missing details. Both paths continue to Record outcome.
Supply the branch data
The template does not collect or infer Enrollment status. Before enrolling real members, choose who maintains the Member enrollment status Form: a staff member editing the member's Form entry, or your existing intake/integration that writes that entry. Keep one current status record per member and update it when the status changes; the included condition matches any matching record, so stale duplicate records can still match.
Replies do not automatically update this field. If replies should change the branch, configure that update in your team's intake Workflow or have staff update the Form. Test the update before the 1-day wait ends.
The internal labels flag records for team review. The template does not assign a staff task or notify a staff member. Establish a team review process for these labels, or add an approved internal notification action before launch.
Test both paths
Use two synthetic members before publishing for real members.
| Test member | Enrollment status | Expected path |
|---|---|---|
| Matching example | ready | Ready for welcome |
| Other example | other | Review missing details |
Create a Member enrollment status record for each member and set the field as shown. Keep all email actions inactive and shorten the 1-day delay in your test copy. In your test workspace, publish the Journey and enroll only these synthetic members. Check the Journey member history and the internal labels. Confirm that each member took its expected branch and reached the final step.
A missing Form record does not satisfy the inline condition and follows the fallback. If missing information should hold a member for review, change that fallback before production use.
Also apply the Member enrollment · Stop label to a synthetic enrollment while it is waiting. Confirm that Stop this Journey ends it before further steps run. Connect your actual opt-out process to this ending before production use; the template does not infer opt-outs from replies.
Customize the branch
Click the branch condition, then edit the Form field, operator, and value in Match. Save the condition and test both paths again.
Use an inline condition when this decision belongs to this Journey. Use a named Member Filter when several Journeys or other workspace tools should share the same audience definition. Keep CEL for logic the filter editor cannot express. Inline and named filters both use the query engine; choosing inline primarily removes the extra named object and the trip to another editor.
Add your program's outreach
- Open each inactive email action in the Journey. Review its subject, body, and selected Inbox.
- Adapt the supplied messages to your program and enable them only after approval. Use Add action for other channels or internal notifications.
- Set the delay or other Continue When condition for the relevant step.
- Configure the Journey's active hours and review your workspace timezone.
- Add ending conditions for opt-out, completion, or leaving the program.
- Assign staff ownership and test replies and handoffs before enrolling real members.
These templates coordinate an existing program. They do not supply a treatment plan, clinical triage, or medical advice. Your team sets the approved content and escalation process.